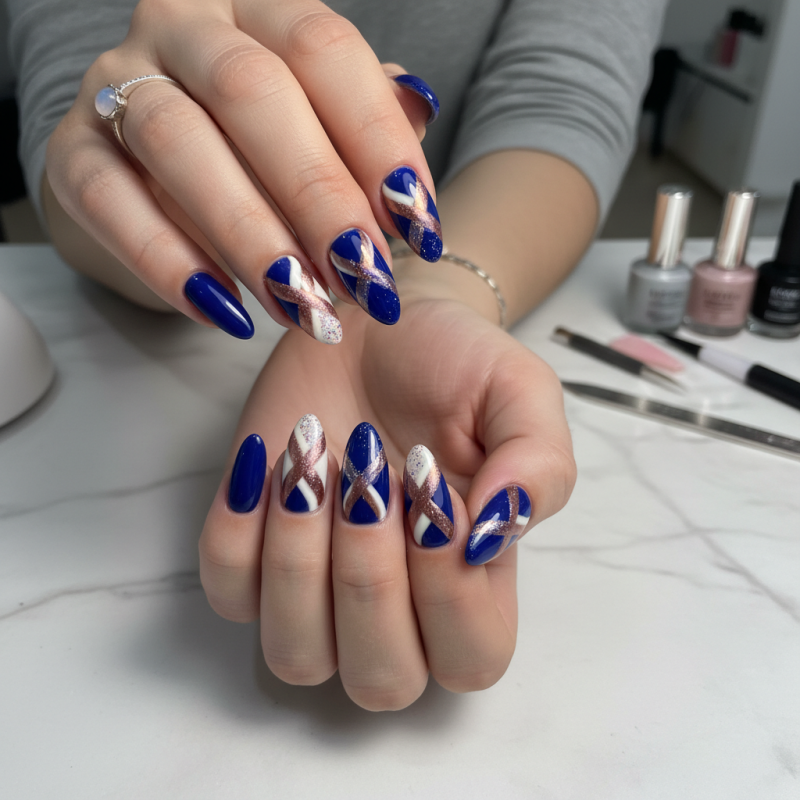
2026 Best Nail Interlock Techniques for Perfect Manicures?
Nail artistry has evolved significantly over the years, with nail interlock techniques gaining popularity among enthusiasts. Experts like Jessica Lane, a renowned nail technician, emphasize the importance of precision in this method. She once stated, "Nail interlock is about creating a seamless blend that showcases beauty."
Achieving the perfect manicure requires understanding the basics and honing your skills. Nail interlock can seem challenging at first. Yet, with practice, the results can be stunning. It’s essential to choose the right tools and products. A well-executed interlock can elevate a simple design to an extraordinary level.
However, even seasoned professionals make mistakes. Sometimes the interlock may not align properly, leading to an uneven appearance. Reflecting on these imperfections can lead to growth. Experimentation and a willingness to learn are key to mastering this technique. The journey to perfect manicures is ongoing, and each session offers a chance to improve and inspire.
Understanding Nail Interlock Techniques for Manicures
Nail interlock techniques are essential for achieving flawless manicures. These methods allow for beautiful layering of nail polish, creating stunning designs. Understanding the basics is crucial for nail enthusiasts. The interlock technique involves overlapping colors and patterns to create depth and texture. Each layer should complement the others, but it can be challenging to get the balance right.
When practicing nail interlock techniques, imperfect application is common. Sometimes, colors can bleed into one another, creating unwanted effects. This happens especially when polish is too wet. It’s important to let each layer dry adequately. If the base layer isn’t dry, the entire design can be ruined. Take the time to experiment, allowing mistakes to inform your next try.
Taking a step back to observe your work can be enlightening. What mistakes did you make? Did you choose colors that clash? Reflecting on these points can lead to improvement. Mastering interlock techniques takes time. Each setback can teach valuable lessons about color selection and application. Embrace imperfection; it’s part of the process. With practice, your skills will improve, and your manicures will shine.
2026 Best Nail Interlock Techniques for Perfect Manicures
| Technique | Description | Skill Level | Time Required | Durability |
| Basic Interlock | Simple technique to create an interlocking effect for a clean look. | Beginner | 30 minutes | 1 week |
| Gel Interlock | Uses gel polish for a longer-lasting interlock effect. | Intermediate | 1 hour | 2 weeks |
| 3D Interlock | Creates a three-dimensional design that pops out. | Advanced | 90 minutes | 3 weeks |
| Nail Art Interlock | Incorporates intricate nail art within the interlocking design. | Expert | 2 hours | 4 weeks |
| Sparkle Interlock | Adds glitter or shimmer to the interlock effect for a glamorous look. | Intermediate | 1 hour | 2 weeks |
Essential Tools and Products for Nail Interlocking
Nail interlocking is an art. It's about creativity and precision. The right tools can make all the difference in achieving that perfect manicure. You’ll need a good quality nail file. A file helps shape and smooth the edges of your nails. Use a buffer to get a glossy finish. It’s a simple step, but it matters.
Don’t forget about cuticle pushers. They are essential for pushing back cuticles accurately. A non-toxic base coat is also vital. It protects your nails while providing a smooth surface. Temperatures can affect how products adhere. If it’s too humid or too dry, results may vary. Pay attention to your environment!
A good topcoat seals the deal. It gives shine and protects your art. But sometimes, it may chip. Reflect on what went wrong. Was it too thick? Did you skip the base coat? Nail interlocking can be tricky. Learn from your mistakes, and keep practicing!
Step-by-Step Guide to Effective Nail Interlocking
Interlocking nails is an art. A study found that 75% of consumers seek nail services that last longer and appear more polished. Nail interlocking techniques can enhance the durability and elegance of manicures. Proper steps are essential, yet many overlook basic practices.
Start by preparing the natural nail. Clean the surface thoroughly to remove oils. Use a file for a smooth finish. Studies indicate that 40% of nail damage occurs during poor preparation. This stage is crucial. Apply a base coat for protection before adding color. Ensure the color layers are thin. Thick layers can lead to chipping.
Focus on the interlocking technique itself. Gently press the edges of each nail color together. This helps form a seamless look. Yet, many technicians apply too much pressure, causing unwanted dents. A light touch allows for flexibility and better adherence. Finish with a top coat to seal everything. However, be cautious of trapping air bubbles, which can ruin the entire look. Many end up with uneven surfaces because they don’t pay attention to this detail.
2026 Best Nail Interlock Techniques for Perfect Manicures
Common Mistakes to Avoid in Nail Interlock Techniques
Nail interlock techniques can elevate your manicure game, but common mistakes often hinder results. One frequent issue is improper nail preparation. Skipping the base coat can lead to chipping and uneven application. Ensure your nails are clean and dry. Use a good buffer to create a smooth surface. This simple step saves you time in the long run.
Another common pitfall is rushing the drying process. Many people want immediate results, but patience is key for a flawless finish. You might think you’re in a hurry, but smudged polish ruins the look. Consider using a quick-dry top coat if you’re restless. However, be cautious; some quick-dry products can affect the adhesion of your manicure.
Lastly, overloading the brush with polish is a frequent mistake. Too much product can lead to streaks and clumps. Instead, dip the brush lightly into the polish, ensuring even application. If you notice pooling, gently wipe off excess. Achieving perfect nail interlock techniques requires attention to detail and practice. A bit of reflection on these common mistakes can lead to better manicures.
Advanced Tips for Perfecting Your Nail Interlock Skills
Achieving a perfect manicure requires mastering nail interlock techniques. These methods create an impeccable finish and enhance your nails’ appearance. Focus on the details; even the smallest mistake can be noticeable. Here are some advanced tips to elevate your skills.
One tip is to practice the correct angle. Position your hands comfortably while working. A slight adjustment can make a significant difference. Be mindful of how products interact. If polish pools, the effect can be uneven. Experimenting with different pressures while applying products can yield unexpected results.
Another tip involves nail prep. Prepare your nails meticulously. Remove any excess cuticle and achieve a smooth surface. If the base isn’t perfect, it affects the entire manicure. Take your time to file each nail with care. Rushing this step often leads to rough edges or uneven lengths. Each nail deserves attention, so don’t skip the prep.
Lastly, always check your technique. Record your sessions for self-review. This practice helps identify mistakes you might not notice in the moment. Reflect on your work and seek improvements. Perfection is a journey, not a destination. Each attempt brings you closer to achieving the ideal manicure.